Installation de LXC sur Raspberry 3.
* Matériel : Raspberry Pi
Version : 3
* Distribution.
Raspbian Stretch Lite : http://director.downloads.raspberrypi.org/raspbian_lite/images/raspbian_lite-2017-12-01/2017-11-29-raspbian-stretch-lite.zip
Release date: 2017-11-29
1/ Configuration de Raspbian.
pi@raspberrypi:~ $ sudo raspi-config
2/ Mise-à-jour de la distribution.
pi@raspilxc:~ $ sudo apt-get update && sudo apt-get upgrade
3/ Installation des paquets de base.
pi@raspilxc:~ $ sudo apt-get install mc screen vim
4/ Installation de Avahi.
Installation de Avahi : https://miniordi.hacktech.dev/installation-de-avahi/
5/ Installation de LXC.
pi@raspilxc:~ $ sudo apt install lxc lxctl xz-utils bridge-utils dnsmasq-base iptables debootstrap
6/ Vérification.
pi@raspilxc:~ $ sudo modprobe configs
pi@raspilxc:~ $ lxc-checkconfig
--- Namespaces ---
Namespaces: enabled
Utsname namespace: enabled
Ipc namespace: enabled
Pid namespace: enabled
User namespace: enabled
Network namespace: enabled
...
Note : Before booting a new kernel, you can check its configuration
usage : CONFIG=/path/to/config /usr/bin/lxc-checkconfig
pi@raspilxc:~ $
7/ Configuration du réseau : bridge.
Ouvrir :
/etc/lxc/default.conf
Chercher :
lxc.network.type = empty
Remplacer par :
lxc.network.type = veth
lxc.network.link = lxcbr0
lxc.network.flags = up
lxc.network.hwaddr = 00:16:3e:xx:xx:xx
Ouvrir :
/etc/default/lxc-net
Ajouter :
USE_LXC_BRIDGE="true"
LXC_DHCP_CONFILE=/etc/lxc/dhcp.conf
Ouvrir :
/etc/lxc/dhcp.conf
Ajouter :
dhcp-host=vm01,10.0.3.11
dhcp-host=vm02,10.0.3.12
dhcp-host=vm03,10.0.3.13
8/ Rédemarrage du service réseau lxc-net.
pi@raspilxc:~ $ sudo systemctl restart lxc-net
pi@raspilxc:~ $ sudo systemctl status lxc-net
● lxc-net.service - LXC network bridge setup
   Loaded: loaded (/lib/systemd/system/lxc-net.service; enabled; vendor preset: enabled)
   Active: active (exited) since Tue 2018-02-27 20:10:17 CET; 26s ago
  Process: 1621 ExecStart=/usr/lib/arm-linux-gnueabihf/lxc/lxc-net start (code=exited, status=0/SUCCESS)
 Main PID: 1621 (code=exited, status=0/SUCCESS)
      CPU: 110ms
   CGroup: /system.slice/lxc-net.service
           └─1686 dnsmasq --conf-file=/etc/lxc/dhcp.conf -u dnsmasq --strict-order --bind-interfaces --pid-file=/run/lxc/dnsmasq.pid --listen-address 10.0.3.1 --dhcp-range 10.0.3.2,10.0.3.254 --dhcp-l
...
9/ Vérification.
pi@raspilxc:~ $ ip -4 -o a show lxcbr0
4: lxcbr0    inet 10.0.3.1/24 scope global lxcbr0\       valid_lft forever preferred_lft forever
10/ Création du conteneur vm01.
pi@raspilxc:~ $ sudo lxc-create -t download -n vm01
Setting up the GPG keyring
Downloading the image index
---
DIST	RELEASE	ARCH	VARIANT	BUILD
---
...
debian	stretch	armel	default	20180226_22:42
debian	stretch	armhf	default	20180226_22:42
...
---
Distribution: debian
Release: stretch
Architecture: armel
Downloading the image index
Downloading the rootfs
...
The image cache is now ready
Unpacking the rootfs
...
11/ Création du conteneur vm02.
pi@raspilxc:~ $ sudo lxc-create -t download -n vm02
12/ Démarrer les 2 conteneurs.
pi@raspilxc:~ $ sudo lxc-start -n vm01
pi@raspilxc:~ $ sudo lxc-start -n vm02
13/ Listage des conteneurs.
pi@raspilxc:~ $ sudo lxc-ls --fancy
NAME STATE   AUTOSTART GROUPS IPV4      IPV6
vm01 RUNNING 0         -      10.0.3.11 -
vm02 RUNNING 0         -      10.0.3.12 -
14/ Connexion sur le conteneur vm01.
pi@raspilxc:~ $ sudo lxc-attach -n vm01
root@vm01:/#
15/ Mise-à-jour de la distribution.
root@vm01:/# apt-get update && apt-get upgrade
16/ Installation des paquets de base.
root@vm01:/# apt install iputils-ping mc screen vim
17/ Test de connexion internet.
root@vm01:/# ping google.fr -c 1
PING google.fr (216.58.213.131) 56(84) bytes of data.
64 bytes from par21s03-in-f131.1e100.net (216.58.213.131): icmp_seq=1 ttl=52 time=72.3 ms
--- google.fr ping statistics ---
1 packets transmitted, 1 received, 0% packet loss, time 0ms
rtt min/avg/max/mdev = 72.397/72.397/72.397/0.000 ms
18/ Installation d’un serveur Linux-Apache-Mysql-Php.
root@vm01:/# apt-get install mysql-server mysql-client apache2 php libapache2-mod-php phpmyadmin
19/ Configuration de Apache.
Ouvrir :
/etc/apache2/ports.conf
Chercher :
Listen 80
Remplacer par :
Listen 8080
Action :
root@vm01:/# /etc/init.d/apache2 restart
20/ Déconnexion de la vm01.
root@vm01:/# exit
exit
pi@raspilxc:~ $
21/ Routage vers le conteneur vm01.
pi@raspilxc:~ $ sudo iptables -t nat -A PREROUTING -i eth0 -p tcp --dport 80 -j DNAT --to-destination 10.0.3.11:8080
22/ Test à partir du réseau local.
http://http://192.168.1.49/ ou http://raspilxc.local/
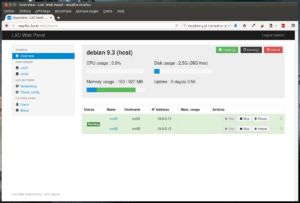
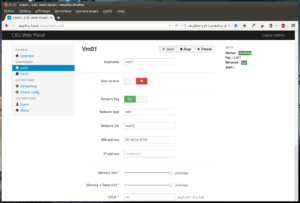
23/ Installation de LXC Web Panel.
– Installation des paquets de développement :
pi@raspilxc:~ $ sudo apt-get install python-setuptools
– Téléchargement de l’installateur :
pi@raspilxc:~ $ wget https://lxc-webpanel.github.io/tools/install.sh
pi@raspilxc:~ $ chmod 777 install.sh
– Installation :
pi@raspilxc:~ $ sudo ./install.sh
– Test :
http://raspilxc.local:5000/
Identifiant par défaut : admin
Mot de passe par défaut : admin
24/ Liens.
[Gandi] [Serveur] [IaaS] Installation de LXC : http://rockstarninja.saventurier.science/gandi-serveur-iaas-installation-de-lxc/
Installation de Avahi : https://miniordi.hacktech.dev/installation-de-avahi/
Raspberry PI 3, Ubuntu & LXC Howto : https://www.blackmagicboxes.com/?p=349
Comments are closed, but trackbacks and pingbacks are open.